
Moving a VPS is more than copying website files from one server to another. A successful migration requires you to account for applications, databases, DNS, email, SSL certificates, scheduled jobs, permissions, firewall rules, external integrations, and data that may continue changing during the move.
This VPS migration checklist provides a practical way to plan, test, execute, and verify a server migration while keeping a rollback option available.
Whether you are upgrading to a larger VPS, changing hosting providers, replacing an older server, or moving an application to a new environment, the safest approach is to treat the migration as a controlled change rather than a simple file transfer.
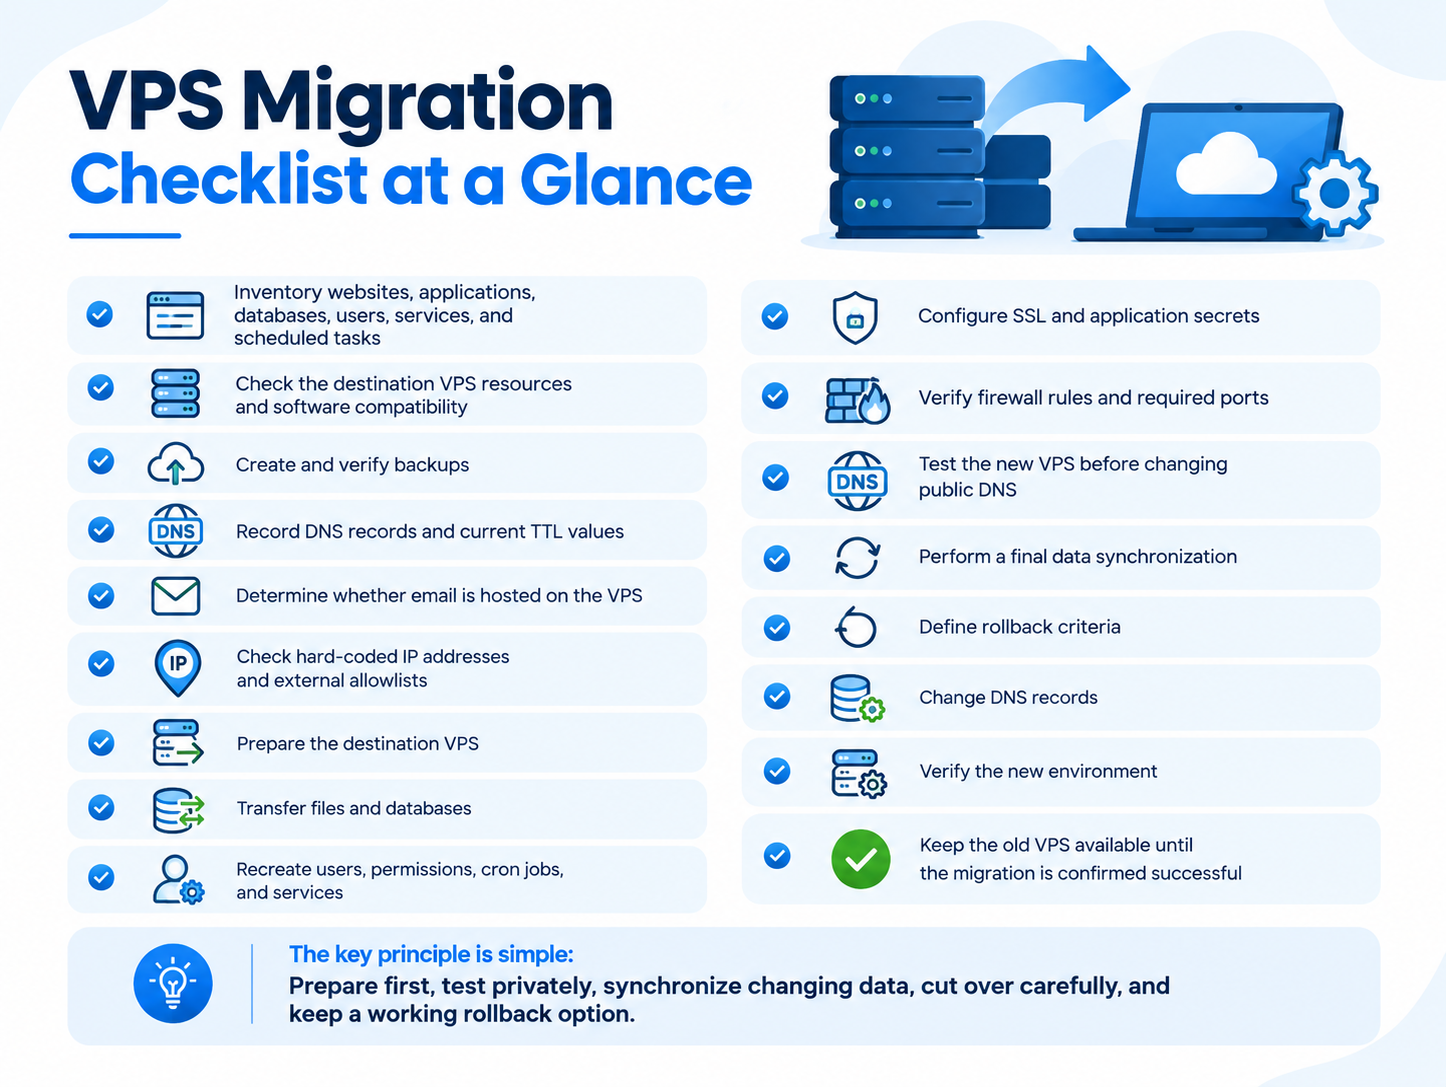
VPS Migration Checklist at a Glance
Before starting the detailed process, use this quick checklist:
- Inventory websites, applications, databases, users, services, and scheduled tasks
- Check the destination VPS resources and software compatibility
- Create and verify backups
- Record DNS records and current TTL values
- Determine whether email is hosted on the VPS
- Check hard-coded IP addresses and external allowlists
- Prepare the destination VPS
- Transfer files and databases
- Recreate users, permissions, cron jobs, and services
- Configure SSL and application secrets
- Verify firewall rules and required ports
- Test the new VPS before changing public DNS
- Perform a final data synchronization
- Define rollback criteria
- Change DNS records
- Verify the new environment
- Keep the old VPS available until the migration is confirmed successful
The key principle is simple:
Prepare first, test privately, synchronize changing data, cut over carefully, and keep a working rollback option.
1. Inventory Everything on the Existing VPS
Before moving anything, document what the current VPS actually does.
A server can contain services that were installed months or years ago and are easy to overlook. This is why a migration should begin with an inventory rather than with file copying.
Record:
- Websites and applications
- Domains and subdomains
- Databases and database versions
- Web server and application runtimes
- PHP, Node.js, Python, or other required runtimes
- System services
- Cron jobs and scheduled tasks
- Background workers and queues
- SSL certificates
- Firewall rules
- Open ports
- Mounted storage
- User accounts and permissions
- SSH keys
- External APIs and integrations
- Application environment variables and secrets
- DNS records
- Reverse DNS/PTR configuration
- Outbound email configuration
Also identify anything that depends on the existing VPS IP address.
For example, an external service may have the old IP address in an allowlist even though the main website uses a domain name.
Check for hard-coded IP addresses
Search application configuration and server settings for the old IP address.
Pay particular attention to:
- Application configuration files
- API integrations
- Database connection settings
- Firewall allowlists
- Webhooks
- Third-party services
- Monitoring systems
- Scripts and cron jobs
A migration can appear successful while one application component continues trying to connect to the old server.
2. Check the New VPS Requirements
The destination VPS needs enough resources and software compatibility to run the existing workload.
Check:
- CPU
- RAM
- Storage capacity
- Operating system
- Database version
- Web server
- Application runtime
- Required extensions
- Network configuration
- Control panel, if applicable
Do not assume that a newer or larger VPS is automatically compatible.
An application may depend on a particular PHP version, database version, extension, library, or operating-system package.
Also leave sufficient storage headroom for future logs, backups, uploads, temporary files, and database growth.
If the migration involves changing operating systems or major software versions, test compatibility before the production cutover.
3. Back Up and Verify Your Data
Create a current backup before starting the migration.
Depending on the server, this may include:
- Website files
- Databases
- User-uploaded content
- Application configuration
- Important server settings
- Email data, if email is hosted locally
- Other application-specific data
Do not treat the existence of a backup file as proof that your data is protected.
Verify that the backup is:
- Complete
- Accessible
- Stored separately from the source VPS where practical
- Suitable for restoration
For important systems, keep an independent backup copy so that a problem with the source or destination server does not remove your only recovery option.
Your VPS Backup & Disaster Recovery Guide should cover backup architecture and recovery in greater depth rather than expanding this migration article into a backup guide.
4. Review DNS, Email, and IP Dependencies
DNS is one of the most important parts of a VPS migration, particularly when the destination VPS has a different public IP address.
Before making changes, document the current DNS configuration.
Check records such as:
- A
- AAAA
- CNAME
- MX
- TXT
- SPF
- DKIM
- DMARC
- SRV, where applicable
Also document the DNS provider and confirm that you have access to the account responsible for managing the zone.
Review DNS TTL Before Migration
TTL, or Time to Live, controls how long DNS information can remain cached by recursive resolvers.
If you will change an A or AAAA record, lowering its TTL ahead of the migration can reduce how long some resolvers continue using the previous cached address. However, TTL is not an instant propagation mechanism, and it does not guarantee that every user will switch to the new server simultaneously.
If you control the DNS zone, review the relevant TTL values well before the planned cutover rather than changing them at the last minute.
Determine Whether Email Is Hosted on the VPS
This decision should be made before migration.
If email is hosted somewhere else, do not accidentally change the existing MX, SPF, DKIM, or DMARC configuration.
If email is hosted on the VPS, email becomes another workload that must be migrated.
You may need to account for:
- Mailboxes
- Mail data
- Mail server configuration
- SMTP authentication
- IMAP/POP3 access
- SSL/TLS
- MX records
- SPF
- DKIM
- DMARC
- Hostname and HELO identity
- Reverse DNS/PTR
- Spam filtering
If the new VPS will send email directly, check its PTR/reverse DNS record with the VPS provider and make sure the server’s mail identity is configured appropriately.
Do not treat email as something to “fix later” after the website has already moved.
5. Prepare the Destination VPS
Build the new VPS before changing public traffic.
Install and configure the software required by the applications.
This may include:
- Operating system updates
- Web server
- Database server
- Application runtime
- Required extensions
- Control panel
- Firewall
- SSL components
- Monitoring
- Backup tools
- Application dependencies
Create the required users and verify SSH access before the cutover.
Check:
- SSH keys
- Sudo privileges
- File ownership
- File permissions
- Application service accounts
- Required directories
The destination should be capable of running the application independently before you point production traffic toward it.
For detailed server security configuration, use the dedicated VPS Server Hardening Checklist and VPS Firewall Setup Guide.
6. Transfer Files, Databases, and Application Data
Move the application data required by the new environment.
This may include:
- Website files
- Application files
- Uploaded media
- Configuration files
- Database data
- Generated application data
- Required storage directories
Avoid blindly copying the entire old filesystem.
Temporary files, caches, logs, and operating-system-specific files may not need to be migrated and can sometimes introduce unnecessary problems.
Migrate the Database Carefully
Database migration is more than copying a database once.
First identify:
- Database name
- Database user
- Database credentials
- Database version
- Character set
- Collation
- Application connection settings
Import the database into the destination and confirm that the application can connect to it.
Most importantly, determine what happens to database writes after the initial migration.
For example, an e-commerce application may receive new orders while the first database copy is being transferred. Those new records will not automatically appear on the destination server.
This leads to the next critical step: final data synchronization.
7. Recreate Users, Permissions, Cron Jobs, and Services
A VPS migration can fail even when all website files are present.
Check that the destination server contains the required:
- User accounts
- Groups
- File ownership
- File permissions
- SSH keys
- System services
- Cron jobs
- System timers
- Queue workers
- Background processes
Review Scheduled Tasks Carefully
Do not simply copy cron jobs and immediately enable them on both servers.
Some scheduled tasks should run on only one server.
Examples include:
- Billing processes
- Database imports
- Email queues
- Automated backups
- Data synchronization
- Report generation
- Cleanup scripts
Running the same job on both servers can create duplicate processing or conflicting data.
Decide which server owns each scheduled task during the migration and enable it on the destination only when appropriate.
8. Check Application Secrets and External Integrations
Modern applications often depend on configuration that is not obvious from the website files.
Review:
- .env files
- API credentials
- Database credentials
- OAuth credentials
- Payment gateway keys
- SMTP credentials
- Cloud-storage credentials
- Webhook secrets
- Third-party API configuration
Do not place credentials into public documentation, tickets, or migration notes.
Also verify that external services recognize the new VPS IP if they use IP-based allowlists.
A website can load correctly while its payment gateway, API integration, webhook, or external database connection is still blocked.
9. Verify Firewall Rules and Required Ports
The destination VPS should have the firewall configured before production traffic arrives.
Confirm that required services can communicate through the appropriate ports.
Depending on the environment, these may include:
- SSH
- HTTP
- HTTPS
- Database connections
- Mail services
- Application-specific services
Do not simply open every port to make testing easier.
Allow only the traffic required by the applications and services running on the VPS.
For detailed firewall configuration, link to your VPS Firewall Setup Guide.
10. Configure SSL and HTTPS
Every HTTPS-enabled website should be tested before the DNS cutover.
Check:
- SSL certificate
- Certificate chain
- Domain coverage
- HTTPS redirects
- Subdomains
- Mixed content
- Certificate renewal
- Application-generated URLs
If you use an automated certificate system, confirm that the destination VPS can renew the certificate after the migration.
Do not wait until public traffic reaches the new server to discover that HTTPS is incorrectly configured.
11. Test the New VPS Before Changing DNS
This is one of the most important steps in the entire VPS migration checklist.
The new server should be tested privately before production DNS is changed.
Where appropriate, use a temporary hostname, controlled hosts-file mapping, or another testing method to send your own requests to the destination server without changing public DNS.
Functional testing
Test:
- Homepage
- Important pages
- Login
- Registration
- Forms
- Search
- File uploads
- Checkout
- Admin areas
Application testing
Test:
- APIs
- Webhooks
- Payment gateways
- Third-party integrations
- Email notifications
- Background processing
Infrastructure testing
Verify:
- Database connectivity
- SSL
- Firewall
- Scheduled jobs
- Application services
- Error logs
- File permissions
- Resource availability
Do not test only the homepage.
A successful homepage does not prove that the complete application works.
12. Perform the Final Data Synchronization
The initial file and database transfer is not necessarily the final copy.
Files can change. Databases can receive new records. Users can upload content. Queues can process jobs.
Before the final DNS cutover, decide how changing data will be handled.
Depending on the application, you may use:
- A final file synchronization
- A final database export/import
- Database replication
- Temporary maintenance mode
- Temporary read-only mode
- A controlled write freeze
The exact approach depends on the application’s architecture.
The important principle is:
Do not assume that data copied during the first migration pass is still complete at cutover time.
For advanced migrations where production writes must continue with minimal interruption, use the dedicated Zero Downtime VPS Migration Guide rather than expanding this checklist into a replication tutorial.
13. Define the Cutover and Rollback Plan
Before changing DNS, decide exactly what success and failure look like.
Cutover sequence
A practical sequence is:
- Confirm the latest backup.
- Complete the final data synchronization.
- Confirm the destination VPS is ready.
- Freeze or restrict writes if required.
- Confirm SSL and application testing.
- Change the required DNS records.
- Verify traffic is reaching the new VPS.
- Enable scheduled jobs and background workers on the destination.
- Monitor logs, application behavior, and important transactions.
- Keep the old VPS available.
Define rollback criteria
Do not wait for a major incident before deciding whether to roll back.
Consider rollback if:
- Critical application functions fail
- Important data is missing
- Database integrity cannot be confirmed
- Customers cannot log in
- Orders or payments fail
- Required integrations do not work
- Email delivery fails where email was migrated
- SSL cannot be corrected quickly
- Background jobs are producing incorrect results
- Serious application errors continue after troubleshooting
The exact rollback action depends on the architecture, but having predefined criteria makes the decision much easier during a stressful migration.
14. Change DNS and Monitor the Cutover
Once the destination server has passed testing and the final data synchronization is complete, change the required DNS records.
Do not change unrelated DNS records unless the migration requires it.
After the change:
- Verify DNS resolution
- Confirm the new IP address
- Test the website
- Test important application functions
- Check SSL
- Check logs
- Verify background jobs
- Verify email if applicable
- Check external integrations
Remember that DNS caching means different users may temporarily reach different destinations.
TTL helps control caching behavior, but it does not create an instant global switch.
15. Verify the New VPS After Migration
The migration is not finished immediately after the DNS change.
Perform another complete validation.
Website and application
- Website loads correctly
- HTTPS works
- Login works
- Forms work
- Uploads work
- Important application functions work
- APIs work
- Payments work where applicable
Data
- Database is accessible
- Recent records are present
- Uploaded files are available
- No important data was left behind on the old VPS
Infrastructure
- CPU usage is normal
- RAM usage is normal
- Disk usage is normal
- Required services are running
- Firewall behaves correctly
- Scheduled tasks run correctly
- Error logs show no critical problems
Email, if applicable
- MX records are correct
- SPF is correct
- DKIM works
- DMARC is present as intended
- SMTP works
- Mail delivery works
- PTR/reverse DNS is correct
16. Keep the Old VPS for Rollback
Do not immediately delete the source server.
Keep it available until you have enough evidence that the destination VPS is stable.
During this period:
- Continue monitoring the destination
- Verify application activity
- Confirm scheduled tasks
- Confirm backups
- Review logs
- Watch for missing data
- Confirm users are successfully reaching the new environment
Once the rollback window has passed and the destination has been verified, you can plan the safe decommissioning of the old VPS.
The exact retention period depends on the importance of the workload and your organization’s recovery requirements. Do not choose a period simply because another migration guide recommends a fixed number of hours.
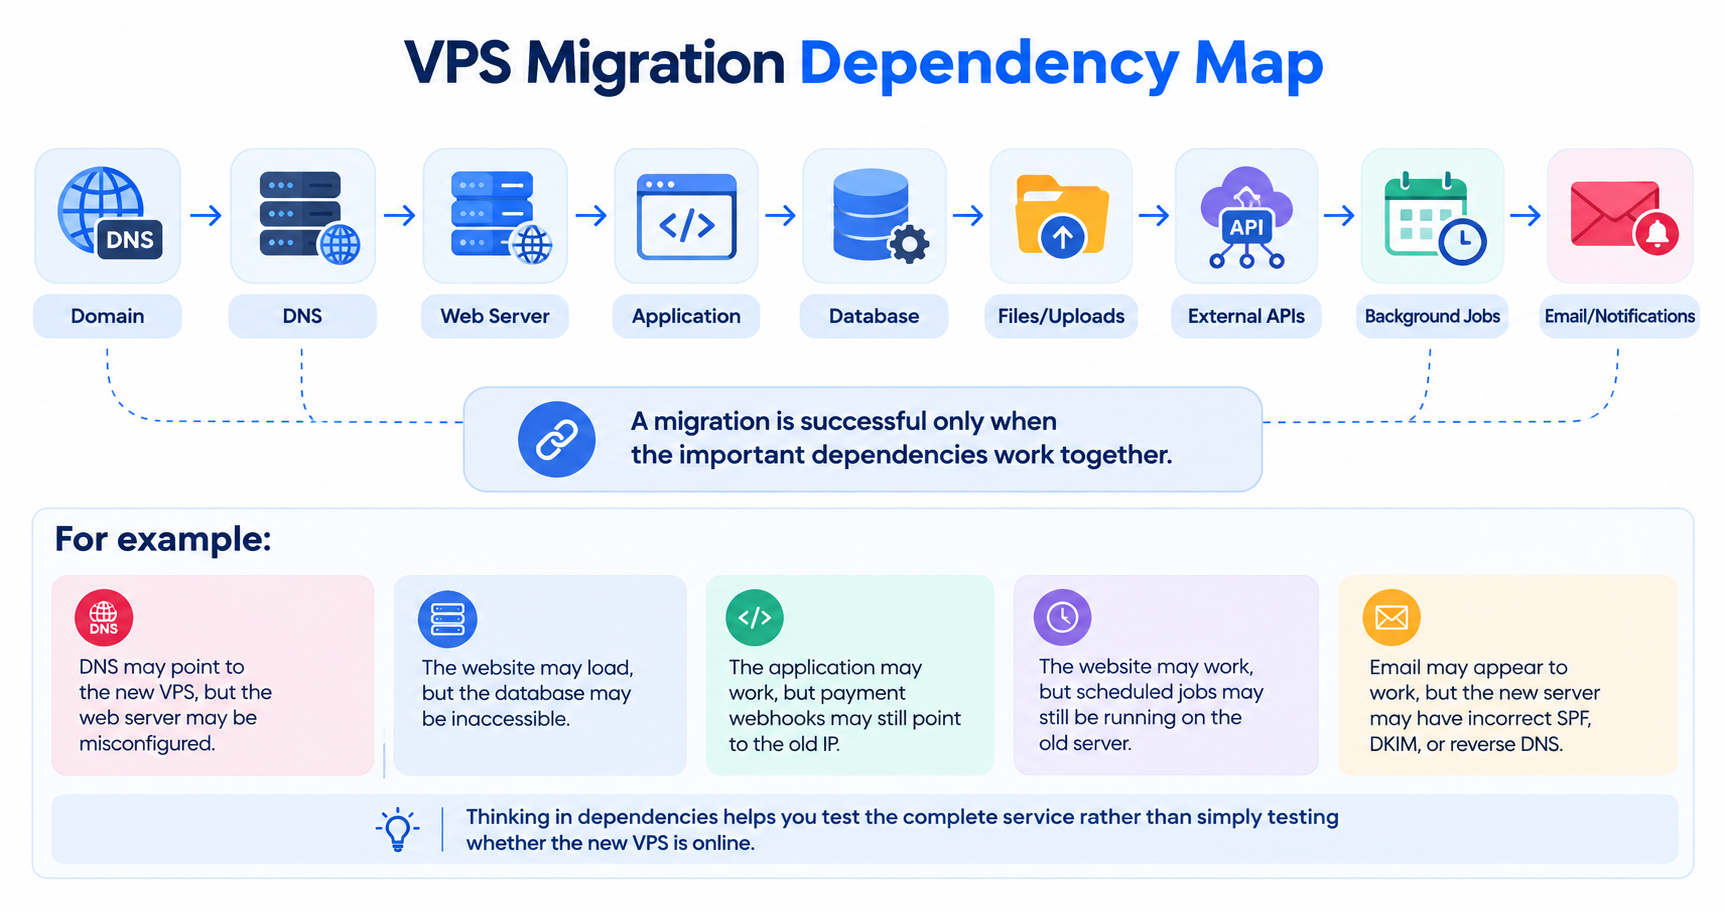
VPS Migration Dependency Map
A useful way to think about migration is as a chain of dependencies:
Domain → DNS → Web Server → Application → Database → Files/Uploads → External APIs → Background Jobs → Email/Notifications
A migration is successful only when the important dependencies work together.
For example:
- DNS may point to the new VPS, but the web server may be misconfigured.
- The website may load, but the database may be inaccessible.
- The application may work, but payment webhooks may still point to the old IP.
- The website may work, but scheduled jobs may still be running on the old server.
- Email may appear to work, but the new server may have incorrect SPF, DKIM, or reverse DNS.
Thinking in dependencies helps you test the complete service rather than simply testing whether the new VPS is online.
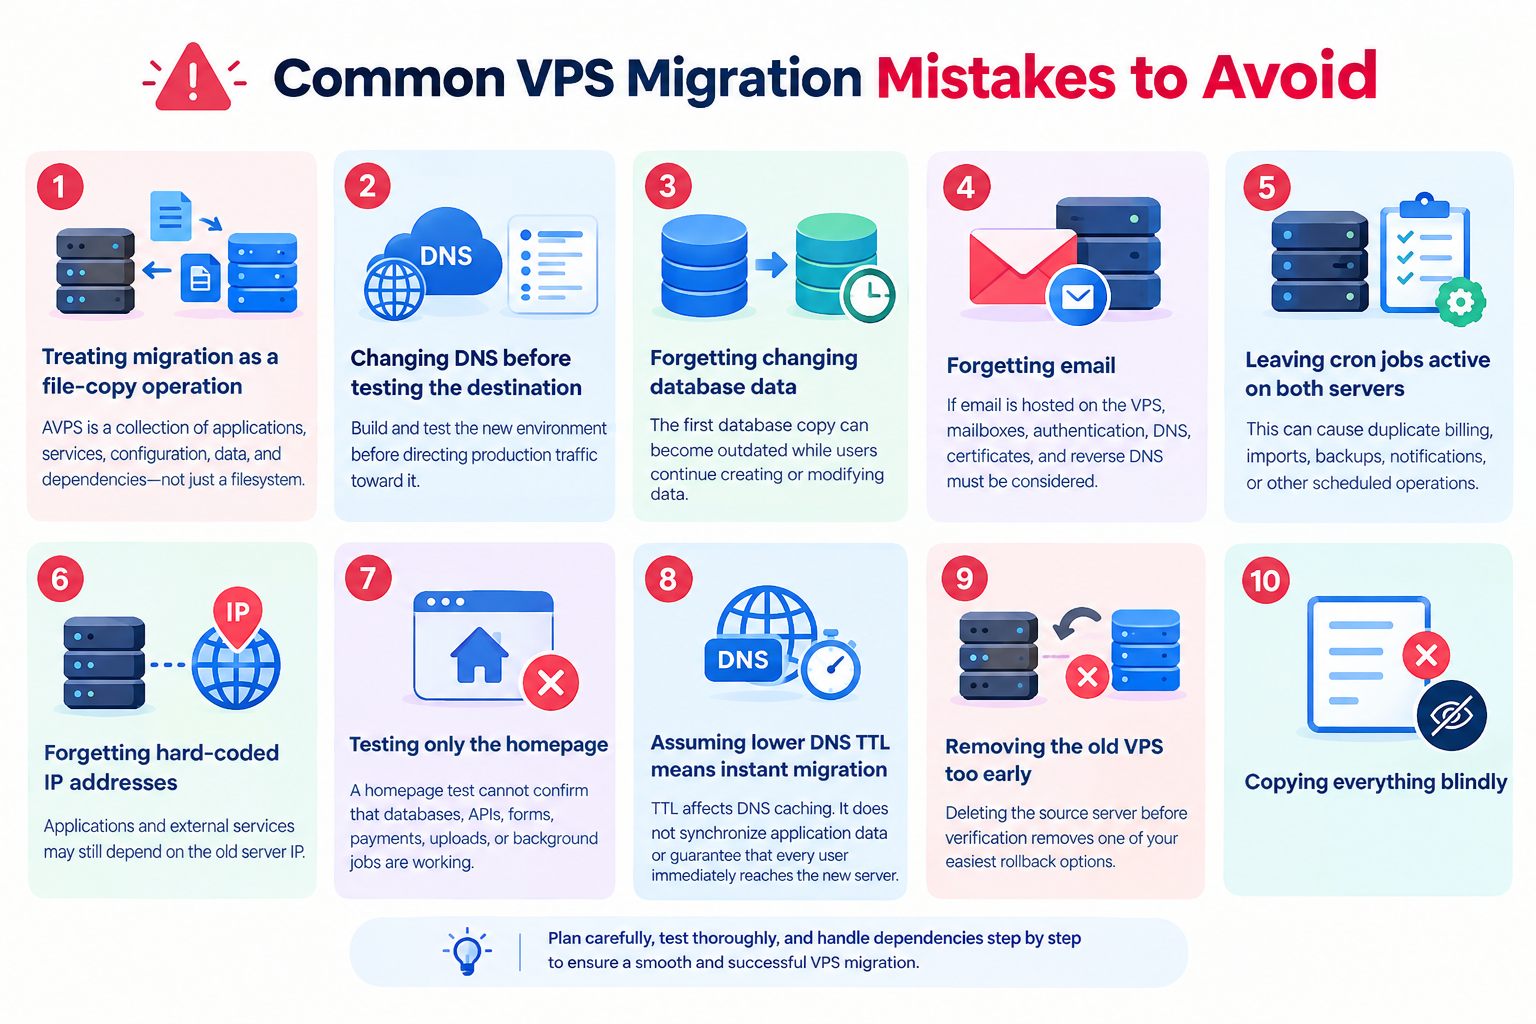
Common VPS Migration Mistakes to Avoid
1. Treating migration as a file-copy operation
A VPS is a collection of applications, services, configuration, data, and dependencies—not just a filesystem.
2. Changing DNS before testing the destination
Build and test the new environment before directing production traffic toward it.
3. Forgetting changing database data
The first database copy can become outdated while users continue creating or modifying data.
4. Forgetting email
If email is hosted on the VPS, mailboxes, authentication, DNS, certificates, and reverse DNS must be considered.
5. Leaving cron jobs active on both servers
This can cause duplicate billing, imports, backups, notifications, or other scheduled operations.
6. Forgetting hard-coded IP addresses
Applications and external services may still depend on the old server IP.
7. Testing only the homepage
A homepage test cannot confirm that databases, APIs, forms, payments, uploads, or background jobs are working.
8. Assuming lower DNS TTL means instant migration
TTL affects DNS caching. It does not synchronize application data or guarantee that every user immediately reaches the new server.
9. Removing the old VPS too early
Deleting the source server before verification removes one of your easiest rollback options.
10. Copying everything blindly
Not every operating-system file, cache, log, or temporary directory needs to move to the new VPS.
Final VPS Migration Checklist
Use this condensed checklist on migration day:
Planning
- Inventory websites and applications
- Record databases and software versions
- Record users and permissions
- Record cron jobs and services
- Record DNS records
- Identify email hosting
- Identify external integrations
- Check hard-coded IP addresses
- Document application secrets and dependencies
Backup
- Create current backups
- Verify backup accessibility
- Keep an independent backup copy
Destination VPS
- Provision required resources
- Install required software
- Configure users and SSH
- Configure firewall
- Configure storage
- Configure SSL
- Configure application dependencies
- Configure monitoring and backups
Migration
- Transfer files
- Migrate databases
- Recreate services
- Recreate cron jobs
- Configure application secrets
- Verify permissions
- Check external IP allowlists
- Check PTR/reverse DNS if applicable
Testing
- Test the destination privately
- Test website functionality
- Test database connectivity
- Test APIs
- Test forms and uploads
- Test payments if applicable
- Test email if applicable
- Check SSL
- Check logs
- Check resource usage
Cutover
- Complete final data synchronization
- Freeze writes if required
- Confirm rollback criteria
- Change DNS
- Verify DNS resolution
- Enable destination cron/jobs
- Monitor application activity
Post-Migration
- Confirm new traffic reaches the destination
- Verify recent data
- Verify scheduled tasks
- Verify email
- Verify external integrations
- Review logs
- Confirm backups
- Keep old VPS available until the rollback window ends
- Decommission the old VPS only after final verification
Frequently Asked Questions
