
Introduction
Moving your website or application to a Virtual Private Server (VPS) is an important step toward better performance, greater flexibility, and more control over your hosting environment. However, one question concerns almost every website owner before starting the migration:
“Can I move my website to a VPS without taking it offline?”
In many cases, the answer is yes—or at least very close to it. With careful planning, proper testing, and a structured migration process, you can perform a Zero Downtime Migration to VPS that minimizes service interruptions and allows visitors to continue accessing your website throughout most of the migration.
It’s important to understand that true zero downtime depends on the type of website or application you’re running. Static websites can often be migrated with no noticeable interruption. Dynamic websites, such as WordPress stores, customer portals, or business applications, usually aim for near-zero downtime, where any interruption is reduced to only a few seconds or minutes during the final transition.
The goal of this guide is to show you how to migrate your website to a VPS with minimal disruption, while avoiding common mistakes that can lead to unnecessary downtime.
Why a Zero Downtime Migration Matters
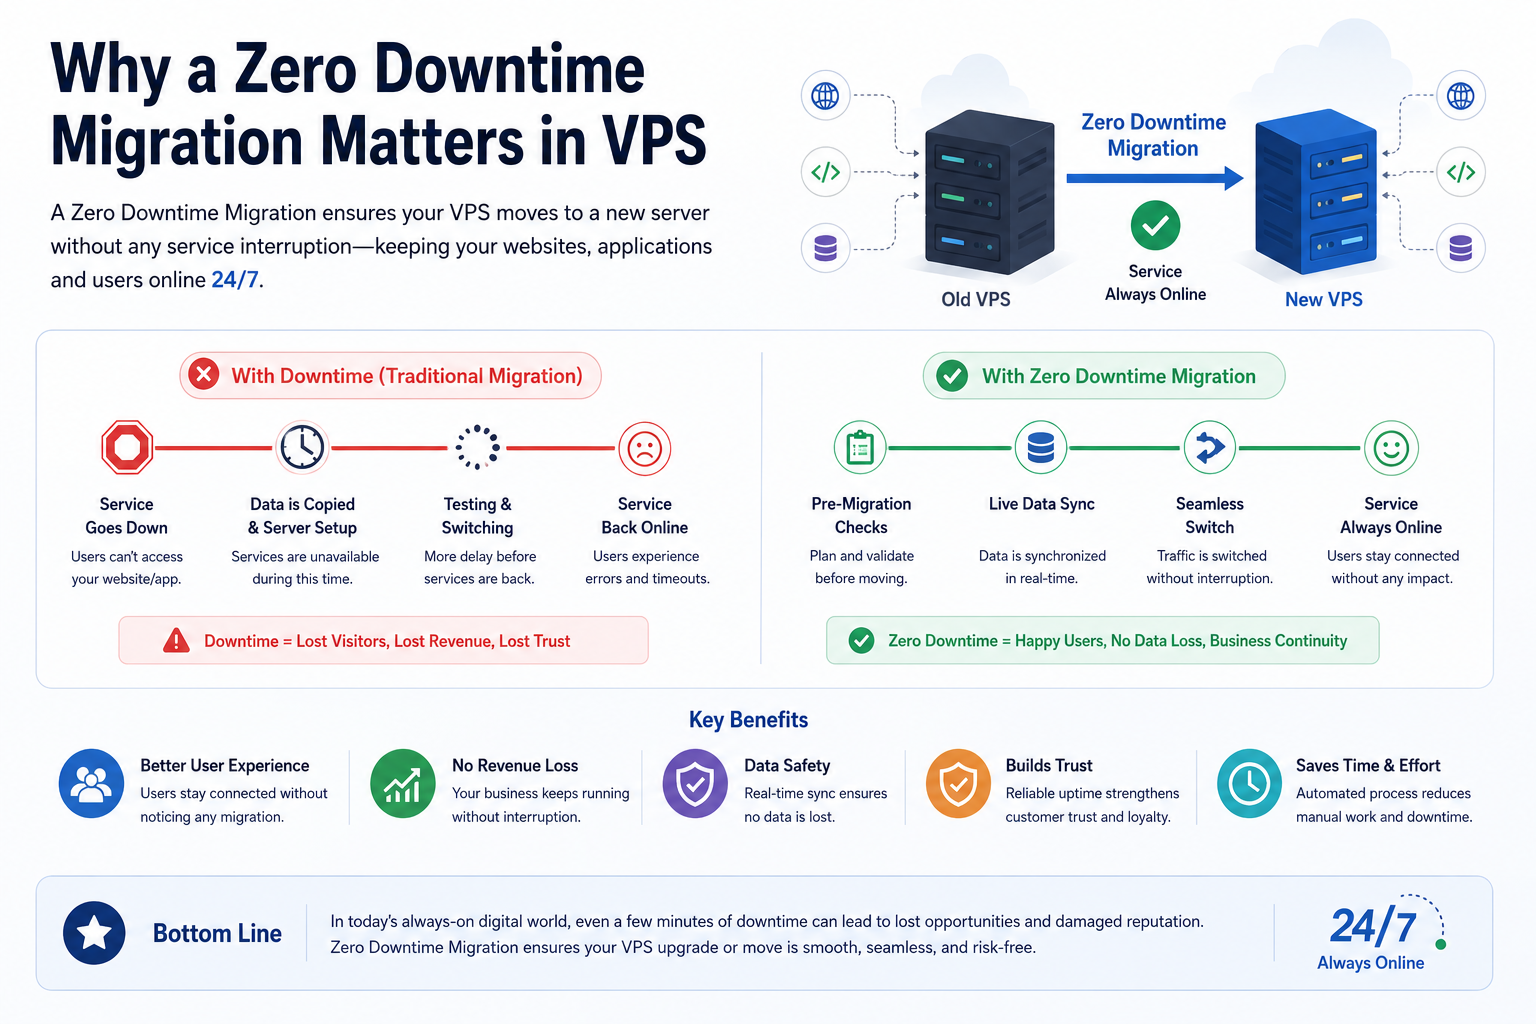
Whether you run an online store, a company website, or a business application, keeping your services available during migration is essential.
Unexpected downtime can result in:
- Visitors seeing error messages
- Lost sales or enquiries
- Interrupted customer sessions
- Failed online transactions
- Reduced customer confidence
- Temporary search engine crawling issues
A well-planned VPS migration helps avoid these problems by ensuring the new server is fully prepared before it begins handling live traffic.
Rather than moving everything at once, a zero downtime approach focuses on preparing, testing, synchronizing, and then performing a carefully controlled cutover.
When Is It Time to Migrate to a VPS?
Businesses migrate to VPS hosting for many different reasons. Some have outgrown shared hosting, while others require more control over their server environment.
Common reasons include:
- Growing website traffic
- Better resource isolation
- Need for custom software installations
- Improved application compatibility
- Hosting multiple websites
- Greater administrative control
- Preparing for future business growth
Regardless of why you’re migrating, the process should prioritize stability over speed. Spending extra time planning can prevent hours of troubleshooting later.
Understand Your Website Before Migrating
Not every website is migrated in exactly the same way. The complexity depends largely on how your website stores and updates data.
Static Websites
Static websites consist mainly of HTML, CSS, JavaScript, and image files. Since there is no database constantly changing, these migrations are generally straightforward and can often achieve true zero downtime.
Dynamic Websites
Dynamic websites use databases that change regularly.
Examples include:
- WordPress websites
- WooCommerce stores
- Laravel applications
- Customer portals
- Membership websites
- Booking systems
These websites require additional planning because new orders, comments, registrations, or uploaded files may continue changing while the migration is in progress. For these environments, the objective is usually near-zero downtime through proper synchronization and careful cutover planning.
Plan Your Migration Before Making Any Changes
Successful migrations begin long before any files are copied.
Creating a migration plan helps reduce risk and ensures every step happens in the correct order.
Before migration day, prepare a checklist that includes:
- Website files
- Databases
- Email services
- DNS records
- SSL certificates
- Scheduled tasks
- Third-party integrations
- Backup locations
- Rollback procedures
Having everything documented allows you to recover quickly if something unexpected happens.
Create a Complete Backup
Before making any changes, create a full backup of your existing hosting environment.
Your backup should include:
- Website files
- Databases
- Email data (if hosted on the server)
- Configuration files
- SSL certificates (where applicable)
Even if everything goes according to plan, a backup provides peace of mind and allows you to restore services if needed.
Internal Linking Opportunity: VPS Backup Strategy
Prepare the New VPS Before Migration
One of the biggest mistakes is migrating directly to a server that hasn’t been fully configured.
Instead, complete all necessary preparation before transferring any production traffic.
The VPS should already have:
- The operating system installed
- Required software packages
- Web server configured
- Database server installed
- PHP or application runtime configured
- User accounts created
- Required directories prepared
This allows you to focus entirely on migration rather than server configuration.
Internal Linking Opportunity: Initial VPS Server Setup Guide
Perform an Initial File Transfer
Once the VPS is ready, begin transferring your website files.
Instead of waiting until the migration window, many administrators perform an initial synchronization well in advance.
This first transfer copies the majority of your files while your existing website continues serving visitors normally.
Large websites benefit significantly from this approach because the final migration window becomes much shorter.
After the initial copy:
- Verify file integrity.
- Check directory structure.
- Confirm file permissions.
- Ensure configuration files reference the correct environment.
At this stage, your production website should still be operating from the original server.
Synchronize Files Before the Final Cutover
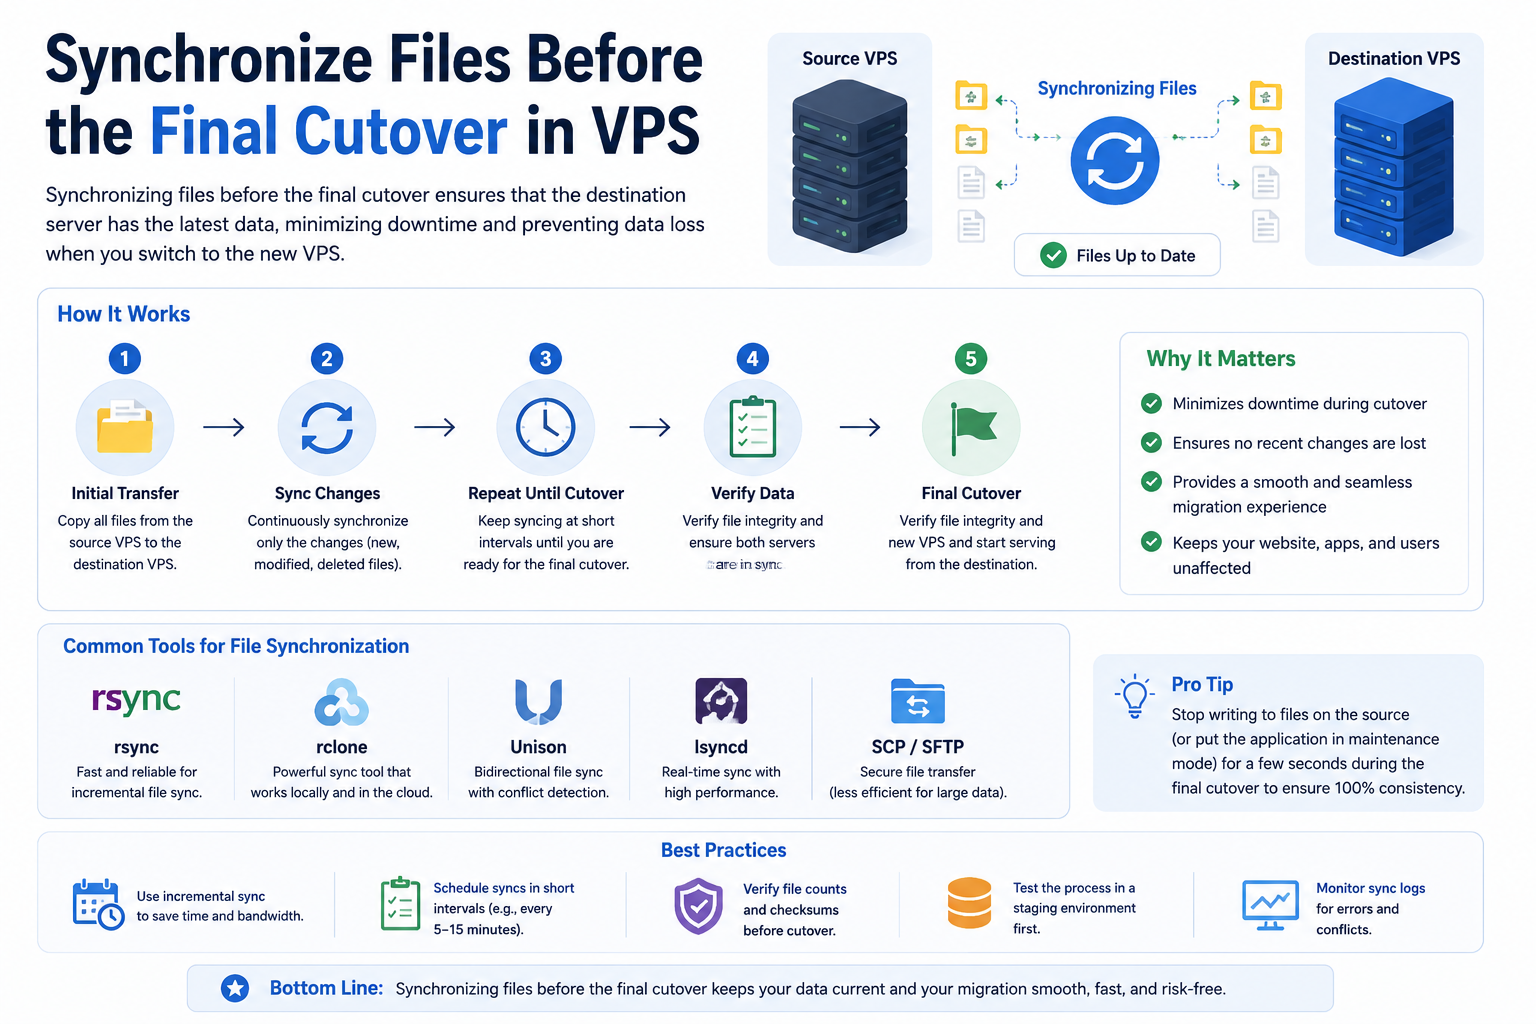
After the initial transfer, your website may continue changing.
For example:
- New images may be uploaded.
- Website content may be updated.
- Application logs may change.
- User-generated files may increase.
Rather than copying everything again, perform an incremental synchronization shortly before switching traffic.
Incremental synchronization transfers only the files that have changed since the initial copy, making the final migration much faster and reducing the likelihood of downtime.
Migrate the Database Carefully
Unlike website files, databases often change every minute.
A business website may receive:
- Customer orders
- User registrations
- Contact form submissions
- Blog comments
- Inventory updates
If these changes are not synchronized correctly, important information could be lost.
A safer approach is to:
- Export the current database.
- Import it into the VPS.
- Test database connectivity.
- Perform a final synchronization immediately before the DNS cutover.
For busy websites, administrators sometimes enable a brief maintenance mode or temporarily pause new database write operations during the final synchronization. This helps ensure that no recent transactions are missed while the latest data is copied to the VPS.
The maintenance period is usually very short and significantly reduces the risk of inconsistent data.
Test the Website Before It Goes Live
One of the most common migration mistakes is pointing the domain to the VPS before testing the new environment.
Instead, verify that everything works correctly while the website is still hidden from public visitors.
Common testing methods include:
- Temporary URLs provided by the hosting company
- A staging subdomain
- Modifying your local hosts file to preview the new server
Testing before the DNS switch allows you to identify and fix problems without affecting your live website.
During testing, verify:
- Website pages load correctly
- Images display properly
- Navigation works
- Login pages function
- Contact forms send messages
- Shopping carts operate normally
- Payment gateways connect successfully
- APIs respond correctly
- Database connections work as expected
Finding problems during testing is far better than discovering them after customers begin using the new server.
Reduce DNS TTL Before Migration
One of the most important steps in a Zero Downtime Migration to VPS is preparing your DNS settings before the actual migration begins.
DNS records are cached by internet service providers and devices around the world. Each DNS record has a Time to Live (TTL) value that tells DNS resolvers how long they can keep the record before checking for updates.
Lowering the TTL helps DNS changes spread more quickly after you switch your website to the new VPS.
However, it’s important to understand one limitation: changing the TTL does not immediately affect DNS caches that have already stored the previous value. Those caches will continue using the old TTL until it expires.
For this reason, it’s considered best practice to reduce the TTL 24 to 48 hours before your planned migration, if possible. This gives most DNS resolvers enough time to begin using the lower TTL value before the final cutover.
Planning this step in advance can significantly reduce the time visitors continue reaching the old server after the DNS update.
Perform the Final Data Synchronization
Once you’ve tested the VPS and confirmed everything is working correctly, it’s time for the final synchronization.
This step ensures that any changes made since the initial migration are copied to the new server.
Depending on your website, this may include:
- Recently uploaded files
- Customer orders
- New user accounts
- Updated content
- Product changes
- Recent database records
The objective is to make the new VPS an almost identical copy of the current production server immediately before traffic is redirected.
For websites with frequent activity, this final synchronization is one of the most important steps in reducing downtime.
Verify SSL Certificates Before Switching Traffic
A website may work perfectly on the new VPS, but visitors could still encounter browser security warnings if the SSL certificate hasn’t been installed correctly.
Before updating your DNS records, confirm that:
- The SSL certificate is installed on the VPS.
- HTTPS loads without warnings.
- Redirects from HTTP to HTTPS work correctly.
- Mixed-content issues have been resolved.
Completing these checks before visitors reach the new server helps maintain user trust and prevents unnecessary support requests.
Check Email Services
If your email accounts are hosted on the same server as your website, don’t overlook them during the migration.
Website migrations often focus on files and databases while email settings are forgotten until users stop receiving messages.
Before completing the migration, verify:
- MX records
- SPF records
- DKIM configuration
- SMTP settings
- Email accounts
- Webmail access
- Email forwarding rules
If your email is hosted by a separate provider such as Microsoft 365 or Google Workspace, these settings may not require changes. However, it’s still a good idea to verify that your DNS records remain correct after the migration.
Switch DNS to the New VPS
Once every test has been completed successfully, you can begin the final cutover by updating your DNS records to point your domain to the new VPS.
Because you reduced the DNS TTL beforehand, many visitors will begin reaching the new server sooner than they otherwise would.
During this transition:
- Keep both servers running.
- Monitor incoming traffic.
- Watch application logs.
- Check for unexpected errors.
- Verify that new data is being written to the VPS.
Avoid shutting down the old server immediately. Some visitors may still reach it until DNS propagation has fully completed.
Keeping the previous server online for a short period provides an additional layer of protection.
Validate Scheduled Tasks and Background Services
Many websites depend on automated background processes that users never see.
Examples include:
- Cron jobs
- Scheduled backups
- Queue workers
- Automated reports
- Email notifications
- Data synchronization scripts
These services don’t always migrate automatically.
After switching to the VPS, verify that every scheduled task is running correctly. A website may appear to function normally while important background processes silently fail.
Checking these services immediately after migration helps prevent operational issues that may otherwise go unnoticed for hours or even days.
Monitor the Website After Migration
Even after the DNS update is complete, your work isn’t finished.
The first few hours after migration are an important monitoring period.
Watch for:
- Website availability
- Error messages
- Broken links
- Missing images
- Slow page loading
- Failed logins
- Database errors
- Payment processing issues
Continue monitoring until you’re confident that all visitors are reaching the VPS and every service is functioning normally.
Internal Linking Opportunity: VPS Monitoring Guide
Have a Rollback Plan Ready
Even the best-planned migrations can encounter unexpected issues.
Having a rollback plan doesn’t mean you expect problems—it means you’re prepared if they occur.
A practical rollback strategy should include:
- Keeping the original server online until the migration is confirmed successful.
- Maintaining recent backups of files and databases.
- Recording the original DNS settings.
- Documenting each migration step.
- Knowing how to restore traffic to the previous server if necessary.
If a serious issue is discovered after the DNS cutover, you can redirect traffic back to the original environment while investigating the problem.
Preparing for rollback reduces stress and allows you to resolve issues without prolonged downtime.
Common Mistakes That Cause Downtime
Many website outages during migration are caused by avoidable mistakes rather than technical limitations.
Some of the most common include:
- Skipping a full backup before migration.
- Switching DNS before testing the VPS.
- Forgetting to reduce the DNS TTL in advance.
- Missing the final database synchronization.
- Canceling the old hosting account too soon.
- Overlooking SSL certificate installation.
- Forgetting to verify email services.
- Ignoring scheduled tasks or cron jobs.
- Not having a rollback plan.
Avoiding these mistakes greatly increases the chances of a smooth and successful migration.
Best Practices for a Smooth VPS Migration
Following proven best practices helps reduce risk throughout the migration process.
Consider the following recommendations:
- Schedule the migration during periods of low website traffic.
- Test every critical feature before updating DNS.
- Perform an initial file transfer followed by an incremental synchronization.
- Synchronize databases immediately before the final cutover.
- Keep both servers online until DNS propagation has finished.
- Confirm SSL certificates are working before visitors reach the new server.
- Verify email functionality after migration.
- Monitor website performance closely during the first 24 hours.
- Keep backups available until the migration has been fully validated.
These practices don’t guarantee that every migration will be perfect, but they greatly improve the likelihood of a successful transition with minimal disruption.
Zero Downtime VPS Migration Checklist
Before considering your migration complete, use this checklist to confirm that every critical step has been completed.
Before Migration
✔ Create a full backup of your website and database.
✔ Document your current DNS settings.
✔ Prepare the new VPS environment.
✔ Install all required software and services.
✔ Lower the DNS TTL 24–48 hours before migration, if possible.
During Migration
✔ Perform the initial file transfer.
✔ Migrate and test the database.
✔ Complete an incremental file synchronization.
✔ Verify SSL certificates.
✔ Test the website using a staging domain, temporary URL, or hosts file.
✔ Confirm email services are correctly configured.
After Migration
✔ Update DNS records.
✔ Keep the old server online.
✔ Monitor website functionality.
✔ Verify scheduled tasks and background services.
✔ Watch for errors during DNS propagation.
✔ Cancel the old hosting service only after confirming the migration is fully successful.
Following this checklist can help reduce the risk of unexpected downtime and provide a smoother migration experience.
Frequently Asked Questions
