

Introduction
VPS memory issues are rarely sudden — they build up quietly until the server becomes unstable. Websites slow down, databases freeze, and applications start failing under load.
In most cases, the instinct is to upgrade RAM immediately. But in real VPS environments, that is not always the first or best step.
VPS RAM optimization focuses on improving how Linux manages memory pressure using swap space and kernel-level tuning before considering hardware scaling.
This guide focuses on practical, production-safe techniques that help stabilize memory usage without changing your VPS plan.
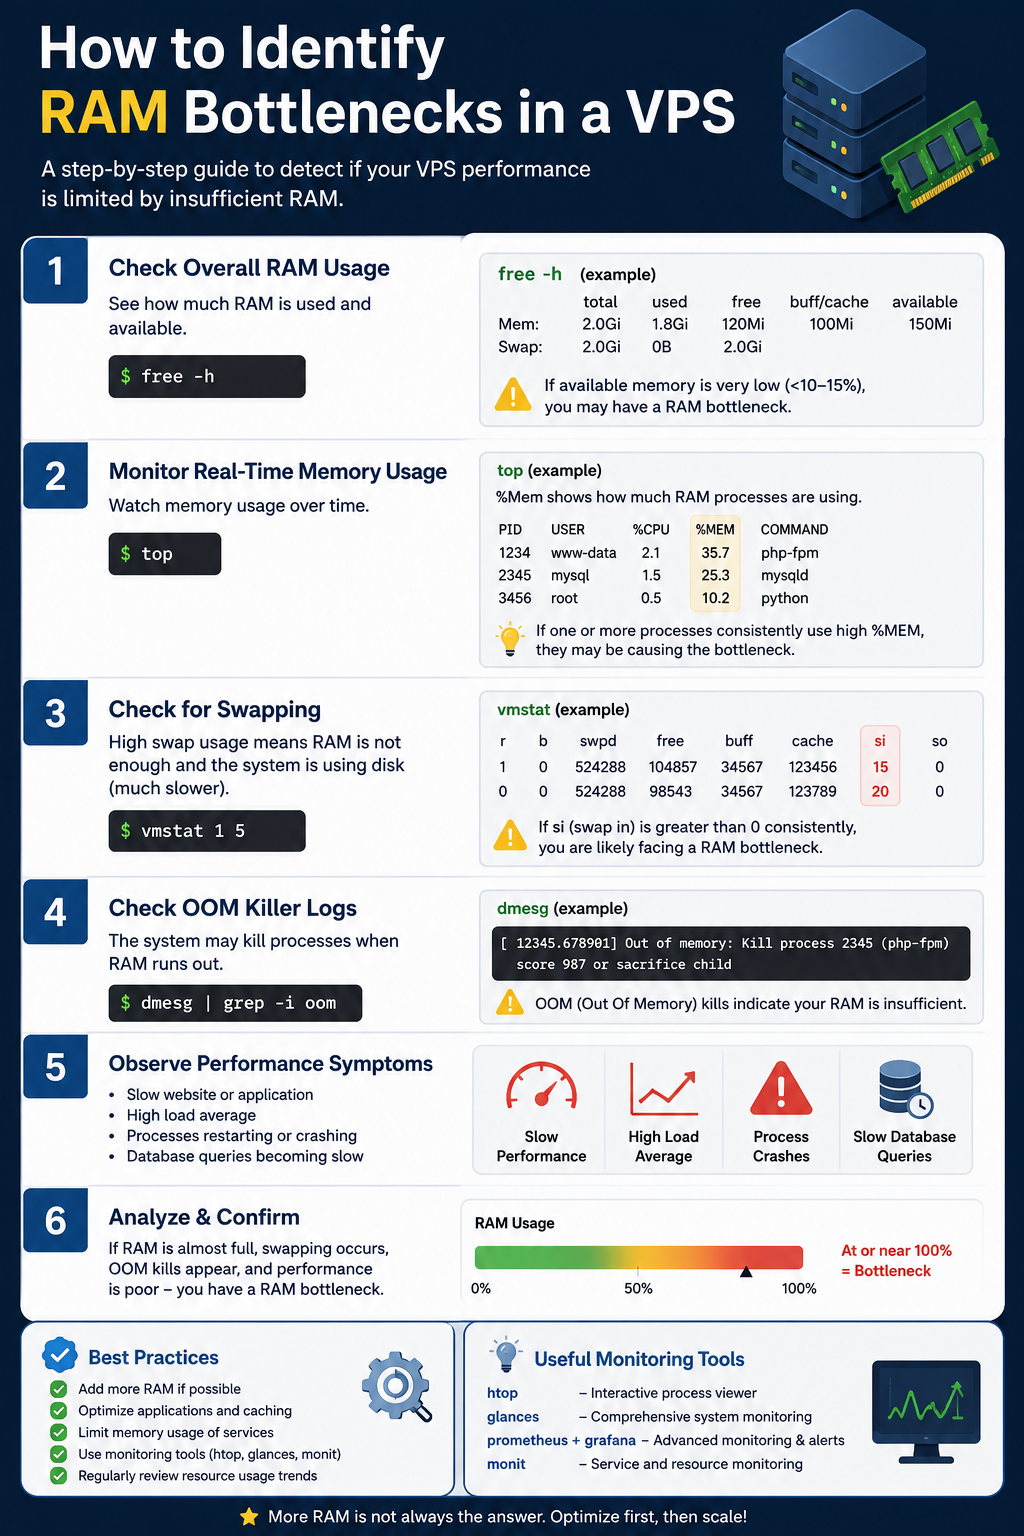
How to Identify RAM Bottlenecks in a VPS
Before applying any optimization, you must confirm that RAM is the real constraint.
Memory pressure often appears alongside other issues like CPU spikes or disk delays, which leads to misdiagnosis.
Common RAM bottleneck signals:
- Frequent Out-of-Memory (OOM) Killer activity
- Swap usage increasing over time
- Applications restarting unexpectedly
- Slow response during traffic spikes
- Database service instability (MySQL, MariaDB, PostgreSQL)
- “Killed process” logs in system journal
You can confirm memory behavior using:
free -h
The most important metric is available memory, not free memory, because Linux actively uses RAM for caching.
Understanding Why VPS RAM Behavior Is Unique
Unlike physical servers, VPS environments run on virtualized memory allocations. Your RAM is isolated but still governed by host-level constraints.
When RAM is exhausted:
- Linux triggers the OOM Killer
- Processes are terminated to prevent system collapse
- Services like PHP-FPM, MySQL, or Node.js may fail silently
Understanding the Linux OOM Killer
When memory is critically low, Linux automatically selects and terminates processes to recover system stability.
This mechanism prevents total server freeze but can cause unexpected application failures.
Technique 1: Swap Space Optimization
What Swap Does in a VPS Environment
Swap acts as overflow memory when RAM is fully consumed.
It temporarily moves inactive memory pages to disk, allowing active processes to continue running.
However:
- Swap is significantly slower than RAM
- It is a stability tool, not a performance boost
- Excessive swap usage indicates memory under-provisioning
Checking Current Swap Status
swapon –show
free -h
If no swap appears, your VPS has no overflow protection during memory spikes.
Creating a Swap File (Recommended Approach)
A swap file is flexible and production-safe.
Step 1: Allocate swap file
sudo fallocate -l 2G /swapfile
Step 2: Secure permissions
sudo chmod 600 /swapfile
Step 3: Format swap space
sudo mkswap /swapfile
Step 4: Enable swap
sudo swapon /swapfile
Step 5: Make it persistent
echo “/swapfile none swap sw 0 0” | sudo tee -a /etc/fstab
Swap Sizing Guidelines
- 1–2 GB RAM VPS → 1–2 GB swap
- 2–4 GB RAM VPS → 2–4 GB swap
- Avoid oversized swap on SSD VPS (performance degradation risk)
Technique 2: Linux Memory Tuning Basics
Linux kernel behavior directly impacts how efficiently RAM is used.
Two key parameters control VPS memory efficiency.
vm.swappiness (Memory Pressure Behavior Control)
vm_swappiness
This parameter controls how aggressively Linux moves memory pages to swap.
- Default: 60
- VPS Recommended: 10–20
- Lower value = prefer RAM usage
- Higher value = earlier swap activation
Recommended VPS setting:
sudo sysctl vm.swappiness=10
Why this matters:
On VPS environments, disk-based swap is significantly slower than RAM access. High swappiness causes unnecessary performance degradation under normal workloads.
vm.vfs_cache_pressure (Filesystem Cache Control)
vm_vfs_cache_pressure
Controls how aggressively Linux reclaims inode and directory cache.
- Default: 100
- Recommended VPS value: 50
Apply setting:
sudo sysctl vm.vfs_cache_pressure=50
Why it matters:
Lower values improve performance on:
- CMS websites
- E-commerce platforms
- API-heavy workloads
- File-intensive applications
vm.overcommit_memory (Advanced Memory Control)
vm_overcommit_memory
Controls how Linux handles memory allocation beyond physical limits.
| Value | Behavior |
| 0 | Default heuristic |
| 1 | Always allow overcommit |
| 2 | Strict allocation control |
Recommended production VPS setting:
sudo sysctl vm.overcommit_memory=2
Important:
Only use this with swap configured. Otherwise, legitimate processes may fail memory allocation.
Technique 3: Real VPS Memory Audit
Optimization without visibility is guesswork.
Top memory-consuming processes:
ps aux –sort=-%mem | head -20
Detailed memory breakdown:
smem -r -k | head -20
System memory overview:
free -m
Focus on RSS (Resident Set Size) to understand real memory consumption per process.
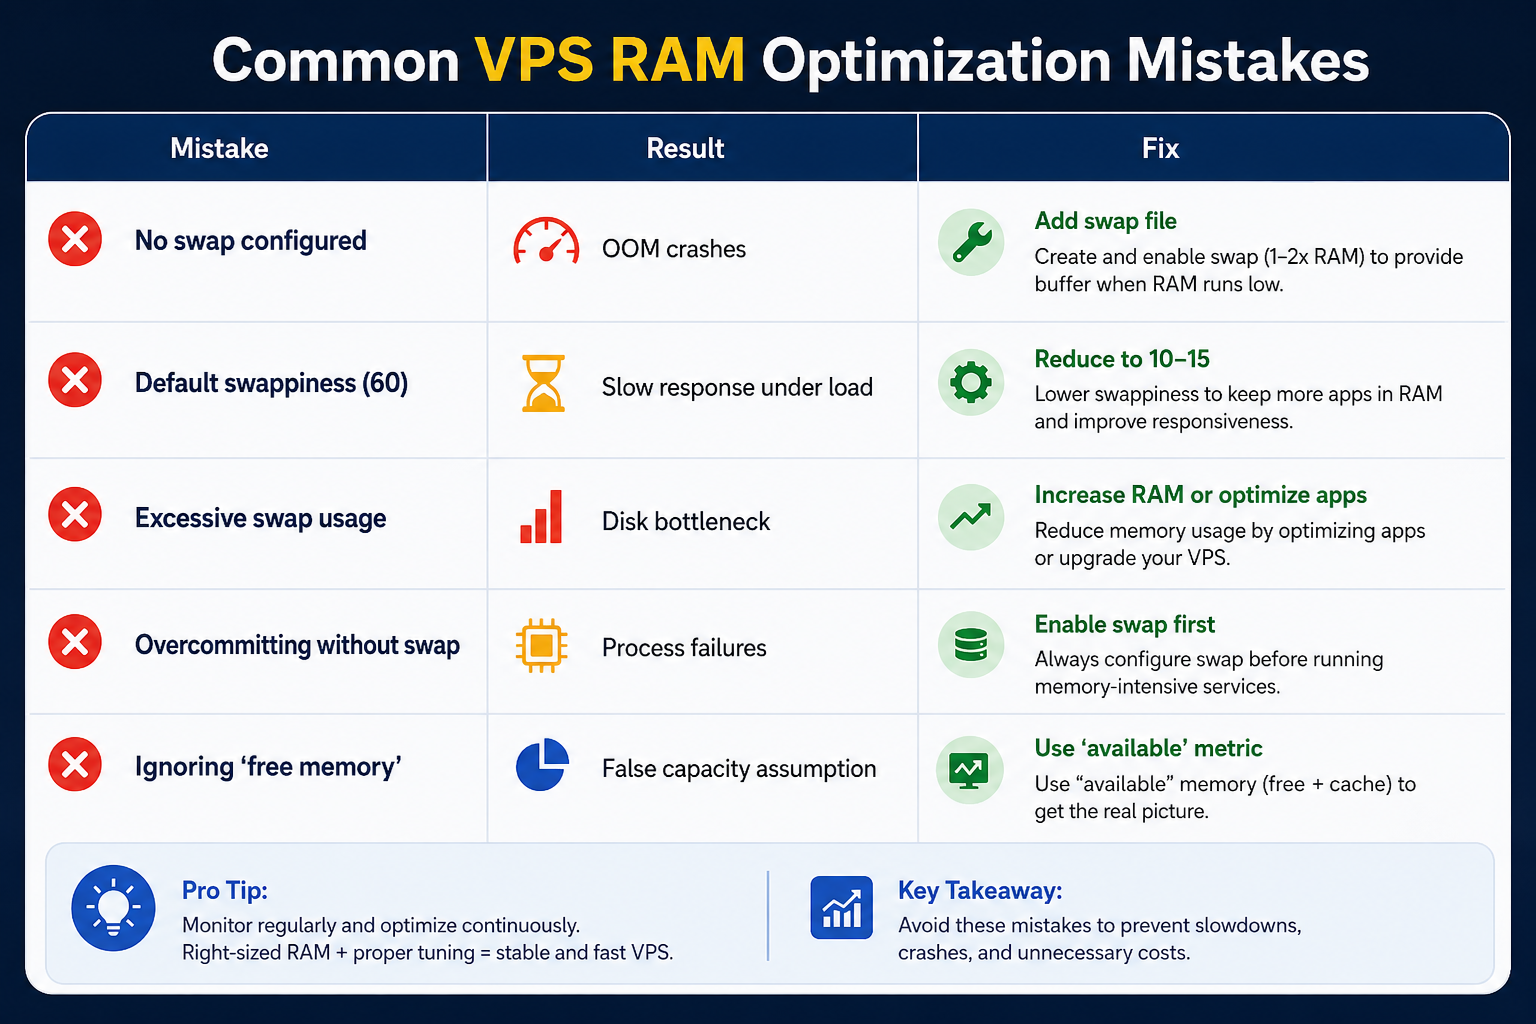
Common VPS RAM Optimization Mistakes
| Mistake | Result | Fix |
| No swap configured | OOM crashes | Add swap file |
| Default swappiness (60) | Slow response under load | Reduce to 10–15 |
| Excessive swap usage | Disk bottleneck | Increase RAM or optimize apps |
| Overcommit without swap | Process failures | Enable swap first |
| Misreading “free memory” | False capacity assumption | Use “available” metric |
Real-World VPS Scenarios
WordPress VPS (2 GB RAM)
- 1 GB swap recommended
- swappiness = 10
- vfs_cache_pressure = 50
- Optimize PHP-FPM workers
Node.js VPS
- Avoid aggressive swapping
- Keep active memory in RAM
- Monitor long-lived processes
Database VPS (MySQL/PostgreSQL)
- Tune buffer sizes carefully
- Prevent memory spikes during queries
- Ensure swap safety net exists
When RAM Optimization Is Not Enough
If after tuning:
- Swap usage remains high
- Applications still crash
- Memory usage steadily increases
- Traffic continues growing
Then the system has reached a true capacity limit.
At this point:
👉 Optimization is no longer effective
👉 Scaling becomes mandatory
See: VPS Vertical Scaling Guide for next steps.
Internal Linking Strategy
This article connects to:
- VPS RAM Exhaustion Diagnosis Guide
- VPS Performance Monitoring Guide
- VPS Slow Performance Root Cause Analysis
- VPS Vertical Scaling Decision Guide
- VPS Server Optimization Stack Tuning Guide
Frequently Asked Questions
